Your First Game: Gem Cave
A hero walks through a cave, collects every gem and keeps away from the bats. Along the way you will use textures and materials, build a level from a text map, give entities their behaviour, draw a HUD, add a title screen and a pause menu, and write tests that play the game for you.
It assumes the tool and VS Code are installed (Installation). Every file below is complete: copy it as shown.
1. Create the project
In VS Code: Ctrl+Shift+P → Veduta: New Game, choose Lua, a folder and the name
gemcave. Or in a terminal:
veduta init gemcave
code gemcave
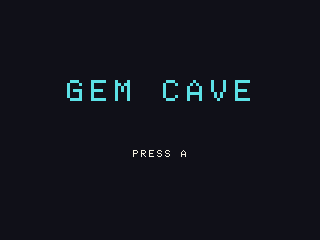
Press F5: the simulator opens with the game's name on a dark screen. Ctrl+Q (the console's Home button) closes it.
The new project already contains a model quad (a 1 × 1 square, the shape of every sprite)
and a scene main, which will be the title screen. See Project Layout
for the other files.
2. Sprites
A sprite is an entity with the quad model and a material that shows a texture. Textures
are small programs of layers, so no image editor is needed. The hero is a rounded yellow
square with two eyes:
{
  "veduta": "texture/1",
  "size": [16, 16],
  "layers": [
    { "type": "rect", "xy": [2, 2], "size": [12, 13], "corner": 4, "color": "#f4c542" },
    { "type": "circle", "center": [5.5, 7], "radius": 1.5, "color": "#101018" },
    { "type": "circle", "center": [10.5, 7], "radius": 1.5, "color": "#101018" }
  ]
}
A gem, a cyan disc with a highlight:
{
  "veduta": "texture/1",
  "size": [16, 16],
  "layers": [
    { "type": "circle", "center": [8, 8], "radius": 6, "color": "#5ce1e6" },
    { "type": "circle", "center": [6, 6], "radius": 2, "color": "#ffffff" }
  ]
}
A bat, purple wings and red eyes:
{
  "veduta": "texture/1",
  "size": [16, 16],
  "layers": [
    { "type": "rect", "xy": [0, 5], "size": [16, 6], "corner": 3, "color": "#8e44ad" },
    { "type": "circle", "center": [8, 8], "radius": 4, "color": "#5b2c6f" },
    { "type": "circle", "center": [6.5, 7.5], "radius": 1, "color": "#ff5555" },
    { "type": "circle", "center": [9.5, 7.5], "radius": 1, "color": "#ff5555" }
  ]
}
Pixels not painted by any layer stay transparent. A material puts a texture on a surface.
A sprite's material is always unlit (the scene's light would darken it), cutout (the
transparent pixels are not drawn) and nearest (the pixels stay sharp):
{ "veduta": "material/1", "texture": "hero", "unlit": true, "alpha": "cutout", "filter": "nearest" }{ "veduta": "material/1", "texture": "gem", "unlit": true, "alpha": "cutout", "filter": "nearest" }{ "veduta": "material/1", "texture": "bat", "unlit": true, "alpha": "cutout", "filter": "nearest" }Walls need no texture, just a colour:
{ "veduta": "material/1", "albedo": "#3d405b", "unlit": true }VS Code completes these files as you type and underlines a field that does not exist. More in Graphics Assets.
3. The map
The cave is a text map, one character per tile: # a wall, P where the hero starts, G
a gem, B a bat. It lives in its own Lua file, a module that returns the rows:
-- The cave, one character per tile: # wall, P the hero's start, G a gem, B a bat.
return {
  "########################",
  "#P.....#...............#",
  "#......#....G.....B....#",
  "#..G...#...............#",
  "#......####....#####...#",
  "#..............#...#...#",
  "#.....B........#.G.#...#",
  "#..............#...#...#",
  "####....########...#...#",
  "#......................#",
  "#...G..........B.......#",
  "#..................G...#",
  "#......................#",
  "########################",
}
Now replace main.lua. The game begins with its settings, the variables that describe a
play, and two helpers: tile finds the map character under a point of the world, and
blocked tells whether a box around a point touches a wall. Each tile is 1 × 1 unit;
column 1, row 1 of the map is at x = 0, y = 0, and rows go down (−y).
-- Gem Cave: find every gem, keep away from the bats.

local MAP = require("level_map")

local HERO_SPEED = 5   -- units per second
local BAT_SPEED = 3
local HALF = 0.4       -- half the size of a hero or bat box, in units

local lives, gems_left = 3, 0
local paused, over, won = false, false, false
local start_x, start_y = 0, 0

-- The tile under a point: column and row count from 1, like the strings of MAP.
local function tile(x, y)
  local col = math.floor(x + 0.5) + 1
  local row = math.floor(-y + 0.5) + 1
  local line = MAP[row]
  if line == nil then
    return "#"
  end
  local c = line:sub(col, col)
  if c == "" then
    return "#"
  end
  return c
end

-- Whether a box of half-size HALF centered on (x, y) touches a wall.
local function blocked(x, y)
  return tile(x - HALF, y - HALF) == "#" or tile(x + HALF, y - HALF) == "#"
      or tile(x - HALF, y + HALF) == "#" or tile(x + HALF, y + HALF) == "#"
end
require("level_map") runs level_map.lua once and returns what it returned. A module
name with dots (require("levels.cave")) is a path under the game's folder.
4. Building the level
A scene is what exists when a level starts. The level's scene holds only a camera and one
invisible entity, builder, whose kind level builds the rest:
{
  "veduta": "scene/1",
  "camera": { "type": "orthographic", "size": 12, "position": [1, -1, 100], "look_at": [1, -1, 0] },
  "background": "#14141f",
  "entities": [
    { "name": "builder", "kind": "level" }
  ]
}
The camera is orthographic, looks down −Z and shows 12 units of height (16 of width on the
4:3 panel): a 2D view. A kind is a table of functions shared by every entity whose
kind names it. init runs when such an entity is loaded, so building the level there
means it is rebuilt every time the scene is loaded. Add to main.lua:
kinds.level = {
  init = function()
    lives, gems_left = 3, 0
    paused, over, won = false, false, false
    for row, line in ipairs(MAP) do
      for col = 1, #line do
        local c = line:sub(col, col)
        local x, y = col - 1, -(row - 1)
        if c == "#" then
          scene.spawn{model = "quad", material = "wall", position = {x, y, 0}}
        elseif c == "G" then
          gems_left = gems_left + 1
          scene.spawn{name = "gem_" .. gems_left, model = "quad", material = "gem",
            tags = {"gem"}, position = {x, y, 1}, scale = {0.6, 0.6, 1}}
        elseif c == "B" then
          scene.spawn{kind = "bat", model = "quad", material = "bat", tags = {"bat"},
            position = {x, y, 1}, scale = {0.8, 0.8, 1}, state = {dir = 1}}
        elseif c == "P" then
          start_x, start_y = x, y
          scene.spawn{name = "hero", kind = "hero", model = "quad", material = "hero",
            position = {x, y, 1}, scale = {0.8, 0.8, 1}}
        end
      end
    end
  end,
}
scene.spawn adds an entity. Walls sit at z = 0 and the actors at z = 1, in front of them.
Tags (gem, bat) let the game find entities by what they are, and state is a table of
the entity's own values. See Entities.
5. The hero
update runs once per tick (20 times a second) for every entity of the kind.
input.dpad() gives the D-pad as two numbers, −1, 0 or 1; multiplied by the speed and by
engine.dt, the length of a tick in seconds, it moves the hero in units per second. Each
axis moves on its own, so the hero slides along a wall instead of stopping dead.
e:overlapping(tag) lists the entities touching this one: every gem touched is collected,
and a bat sends the hero back to the start. trace records that something happened, which
tests count.
kinds.hero = {
  update = function(e)
    if paused or over or won then
      return
    end
    local dx, dy = input.dpad()
    local step = HERO_SPEED * engine.dt
    -- Each axis on its own, so the hero slides along a wall instead of sticking to it.
    if dx ~= 0 and not blocked(e.x + dx * step, e.y) then
      e.x = e.x + dx * step
    end
    if dy ~= 0 and not blocked(e.x, e.y + dy * step) then
      e.y = e.y + dy * step
    end
    camera.follow2d(e.x, e.y, 12)

    for _, gem in ipairs(e:overlapping("gem")) do
      gem:despawn()
      gems_left = gems_left - 1
      trace("gem_collected", {left = gems_left})
      if gems_left == 0 then
        won = true
        trace("won", {lives = lives})
      end
    end

    if #e:overlapping("bat") > 0 then
      lives = lives - 1
      trace("hit", {lives = lives})
      e:set_position(start_x, start_y, 1)
      if lives == 0 then
        over = true
        trace("game_over", {})
      end
    end
    e.state.lives = lives
  end,
}
camera.follow2d keeps the hero in the middle of the screen. e.state.lives copies the
lives where tests can read them.
6. Bats
A bat flies left and right and turns back at walls. Its direction is its own, so it lives
in its state, which scene.spawn gave it:
kinds.bat = {
  update = function(e)
    if paused or over or won then
      return
    end
    local step = BAT_SPEED * engine.dt * e.state.dir
    if blocked(e.x + step, e.y) then
      e.state.dir = -e.state.dir
    else
      e.x = e.x + step
    end
  end,
}
7. Title, pause and the end
game.update runs once per tick before every entity: the place for what concerns the whole
game. On the title scene (main) A starts the level; once the game is won or lost, A goes
back to the title. Select is the console's menu button: it pauses, and Cancel (or
Select again) resumes. Both kinds above already do nothing while paused is true.
function game.update()
  if scene.name() == "main" then
    if input.pressed("a") then
      scene.load("level")
    end
    return
  end
  if over or won then
    if input.pressed("a") then
      scene.load("main")
    end
    return
  end
  if input.pressed("select") then
    paused = not paused
  elseif paused and input.pressed("cancel") then
    paused = false
  end
end
input.pressed is true only on the tick the button goes down, so holding A does not start
the game over and over. The console's Home button never reaches the game: it always
returns to the console's menu.
8. The HUD
game.draw runs for every frame, after the scene is drawn: text and rectangles go over it,
in pixels from the top left of the 320 × 240 frame. The font is 8 × 8 pixels per
character, times scale.
local function centered(y, text, color, scale)
  scale = scale or 1
  hud.text((engine.width - 8 * scale * #text) // 2, y, text, color, scale)
end

function game.draw()
  if scene.name() == "main" then
    centered(80, "GEM CAVE", "#5ce1e6", 3)
    centered(150, "PRESS A", "#f4f0e0")
    return
  end
  hud.rect(0, 0, engine.width, 12, "#000000b0")
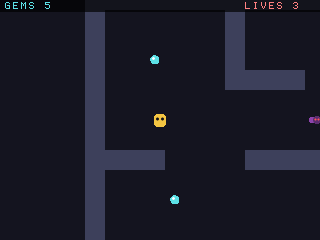
  hud.text(4, 2, "GEMS " .. gems_left, "#5ce1e6")
  hud.text(engine.width - 76, 2, "LIVES " .. lives, "#ff8080")
  if paused then
    hud.rect(80, 90, 160, 60, "#101018e0")
    centered(104, "PAUSED", "#f4f0e0", 2)
    centered(128, "CANCEL TO PLAY", "#a0a0b0")
  elseif won then
    centered(110, "ALL GEMS! A FOR TITLE", "#5ce1e6")
  elseif over then
    centered(110, "GAME OVER - A FOR TITLE", "#ff8080")
  end
end
Last, a rule that must hold in every test run, whatever the buttons: lives stay between 0
and 3. game.init runs once, when the game starts.
function game.init()
  invariant("lives_in_range", function() return lives >= 0 and lives <= 3 end)
end
Press F5 and play: A on the title, the arrow keys (or WASD) to move, Enter (Select) to pause, Escape (Cancel) to resume. Saving a file restarts the game with the change.
9. Tests that play the game
A scenario loads a scene, presses buttons at given ticks and checks what must be true. Tests run without a window and give the same result on every machine, so a scenario that passes on your PC passes on the console. See Testing.
Walking right, the hero stops at the first wall (the wall's edge is at x = 6.5):
{
  "veduta": "scenario/1",
  "scene": "level",
  "seed": 1,
  "ticks": 40,
  "inputs": [
    { "tick": 1, "press": ["right"] }
  ],
  "expect": [
    { "tick": 40, "entity": "hero", "path": "position.x", "op": ">", "value": 5.5 },
    { "tick": 40, "entity": "hero", "path": "position.x", "op": "<", "value": 6.5 }
  ]
}
Two units down and two to the right is the first gem:
{
  "veduta": "scenario/1",
  "scene": "level",
  "seed": 1,
  "ticks": 40,
  "inputs": [
    { "tick": 1, "press": ["down"] },
    { "tick": 9, "release": ["down"] },
    { "tick": 9, "press": ["right"] },
    { "tick": 17, "release": ["right"] }
  ],
  "expect": [
    { "tick": 40, "trace": "gem_collected", "count_min": 1, "count_max": 1 },
    { "tick": 40, "entity": "hero", "path": "state.lives", "op": "==", "value": 3 }
  ],
  "screenshots": [0, 20]
}
Walking along the bat's row costs a life:
{
  "veduta": "scenario/1",
  "scene": "level",
  "seed": 1,
  "ticks": 100,
  "inputs": [
    { "tick": 1, "press": ["down"] },
    { "tick": 21, "release": ["down"] },
    { "tick": 21, "press": ["right"] }
  ],
  "expect": [
    { "tick": 100, "trace": "hit", "count_min": 1 },
    { "tick": 100, "entity": "hero", "path": "state.lives", "op": "<", "value": 3 }
  ]
}
While paused, the D-pad does nothing:
{
  "veduta": "scenario/1",
  "scene": "level",
  "seed": 1,
  "ticks": 30,
  "inputs": [
    { "tick": 1, "press": ["select"] },
    { "tick": 2, "release": ["select"] },
    { "tick": 3, "press": ["right"] }
  ],
  "expect": [
    { "tick": 30, "entity": "hero", "path": "position.x", "op": "==", "value": 1 }
  ],
  "screenshots": [30]
}
And A on the title loads the level:
{
  "veduta": "scenario/1",
  "scene": "main",
  "seed": 1,
  "ticks": 10,
  "inputs": [
    { "tick": 1, "press": ["a"] },
    { "tick": 2, "release": ["a"] }
  ],
  "expect": [
    { "tick": 10, "trace": "scene_load", "count_min": 2, "count_max": 2 },
    { "tick": 10, "entity": "hero", "path": "position.x", "op": "==", "value": 1 }
  ]
}
Veduta: Test (or veduta test in a terminal) runs them all, together with the start
scenario the project came with:
scenario bat_hit              pass  golden new
scenario first_gem            pass  golden new
scenario pause                pass  golden new
scenario start                pass  golden new
scenario title                pass  golden new
scenario walk                 pass  golden new
PASS
golden new means the scenario has no recorded outcome yet. Record them once the game
plays as you want:
veduta test --update-goldenFrom then on, a change that alters anything that happens in a scenario fails the test until you look at it and record again (see Testing). Instead of writing inputs by hand you can record them: in the simulator press F5, play, and F5 again saves the run as a scenario.
10. On the console
Put the console's SD card in the PC (it appears as a drive named VEDUTAOS) and run
Veduta: Deploy to the Console's Card (or veduta deploy). Put the card back in the
console: the dashboard lists gemcave, and A plays it. See
Publishing to the Console.
Ideas to go further
- A second map: another module and scene, loaded when every gem is collected.
- Animated bats: two textures and materials, switched every few ticks with
e.material. - A timer in the HUD from
engine.tick, and a scenario that checks a fast run.